Simple Snowman Tag & DIYs
I just love these simple snowman tags, and they are so simple to make. I’ll show how you can draw these precious smiles, even if you are not an artist. And stay until the end for some fun snowman DIYs from my creative friends.
Disclosure: Some links on this page are affiliate links – meaning if you click through and make a purchase I may receive a commission at no additional cost to you. For more information, read our full affiliate disclosure here.
Tutorial for Making Easy Snowman Tags
How to Make Snowman Tags
Not only are they easy to make holiday tags, but also these simple snowmen are fun on cards, or add to decor items too. Grab your circle punches and let’s get creating — they are “snow much fun” I guess you could say. lol.


Supply list for simple snowman tags
- White Paper and glitter or embossed polka dot paper is cute too (snowman)
- Brown Paper (arms/branches)
- Paper for Tags (color of choice) Scraps work well for this!
- Orange paper scrap, or Orange marker (nose)
- Paper Punches
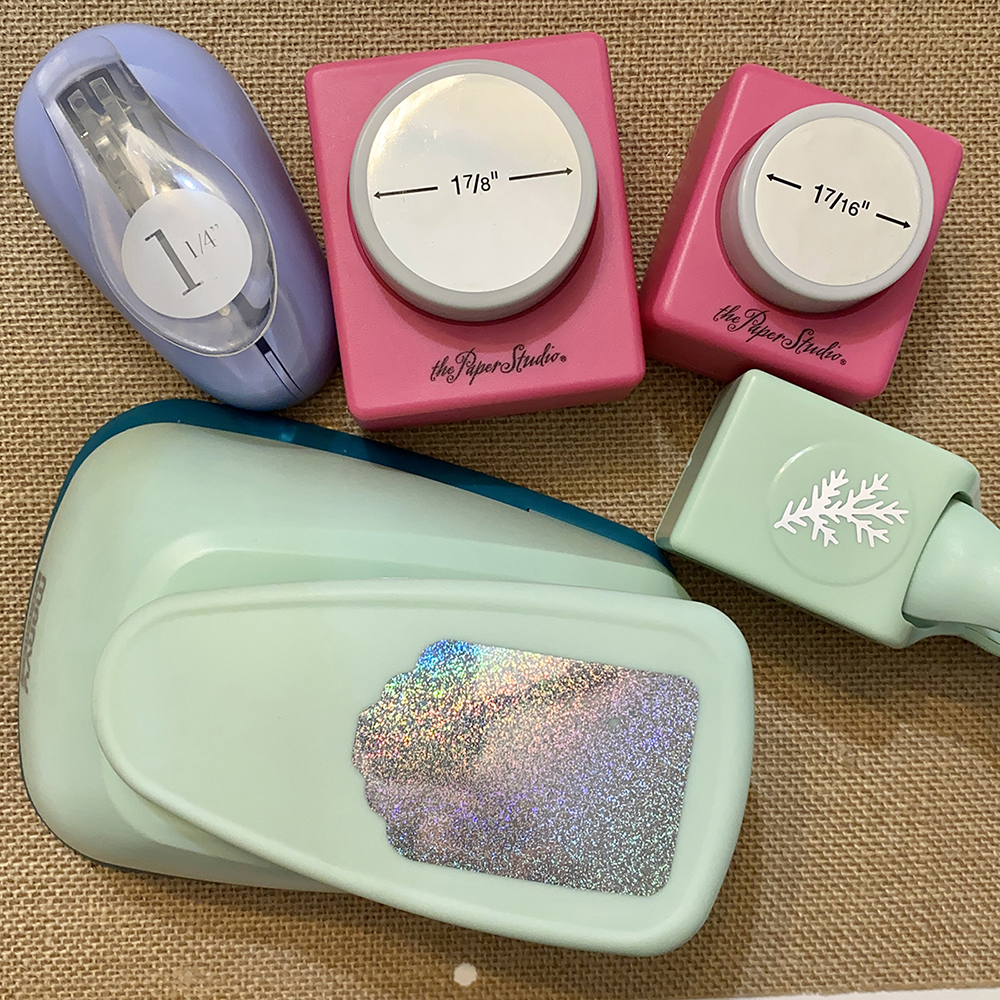
- Circles (I used 3 sizes)
- I used the Martha Stewart but any Branch Punch will work.
- Tags (punch or cut, or use Cricut®)
- Ink (Optional) I used some ink for added dimension
Sign up to get our Friday Freebie Emails for crafters!
Making Snowman Tags in 4 Steps
These simple snowman tags are so simple you probably don’t need directions. For the crafting newbies out there, it’s just a few simple steps to make these adorable simple snowman tags.

Here’s a quick run down, keep reading for details…
- Punch out the items:
- 3 circles, 2 Branch punch
- Cut nose or you can draw on a nose too
- Punch or Cut a tag
- Assemble
These are great for tag exchanges – easy to assemble, prepare, and ADORABLE when done. Check out these winter crafts and the other snowman crafts listed at the end.
More Snowman Crafts
How to assemble your simple snowman tags
Here are the exact punches and circle sizes I used. The Martha Steward branch punch is no longer made, but there are other versions linked in the supplies. You can also draw on the arms.
Start with the bottom circle and layer them up. Overlapping each circle a bit to make your simple snowman tag. I toggled mine to make the snowman appear a little more whimsical.

My favorite look is to have the larger bottom circle off the edge of the tag. This adds some dimension to the tag and gives your snowman a fun, whimsical feel. I trimmed off the access from the large circle.

Tuck the arms/branches under the edge of the circle. I add mine on with a glue pen. You can also draw on the arms as shown here. They are simply lines and a few sticks for fingers.

Next, draw a simple smile on the face. These are perfect if you aren’t an artist. Everyone can draw a smile!
Add a small curved line at the end to accent his cheeks. This gives your snowman a little character. I like to place the nose on first and have it go off the top of the circle to go with that whimsical feel again.
TIP: Punch a couple of extra circles and practice the smile before adding it to the tag. You might want to draw the face before you glue it on…. Sometimes it takes me a few tries to get the face just right. But that’s usually not a problem as it’s easy to cut a new circle out!

Lastly, finish off your tag with a hole on the top and some ribbon, raffia or twine.


NOTE: The branch punch I used by Martha Stewart doesn’t appear to be made anymore.
But here is one that is a similar option on Amazon. I’m sure you can cut branches on your Cricut®, but they are so small a punch makes it so much easier.
That’s it. These are so fun for tag parties (Where you have a handful of crafty friends gather and make tags. Each lady brings supplies for everyone to make one tag design. Then you come away with a stack of fun tags to use that year).
SVG Cards & Tags in our Shop
We have a few other tags and card ideas in our shop that you might enjoy.
Let’s stay connected, my Facebook page has some fun ideas too. Hope to see you there!

Free Snowman Crafts!
- Make a DARLING Polymer Clay Snowman Necklace with a quick and easy tutorial from Laura of Me and My INKlings to wear the entire holiday season!
- Smitha from Smiling Colors is sharing a step-by-step tutorial to teach you How to Draw a Snowflake in just four simple steps.
- Keep the kiddos busy on those snowy afternoons with a fun, Free Printable Snowman Word Search created by Laura of Laura’s Crafty Life.
- Shani from Sunshine and Munchkins has a Free Printable 6-in-1 Snowman Activity Placemat for some extra fun this winter without the cold.
- Make this simple DIY Felt Snowman Wall Hanging for indoor fun with the kiddos all season long! Justine from the Little Dove shows you how!
- Erica from 5 Little Monsters always has the CUTEST projects, and this cuddly Crocheted Plush Snowman is sure to keep the chills away this Winter.
- Brighten those dreary Winter days with a colorful DIY Snowman Suncatcher that makes the perfect front door greeting. Get the full instructions from Katie over at the Crafty Blog Stalker.
- Download and print a Free Juggling Snowman Coloring Page to keep the kiddos busy whether it’s a snow day or not. Hand drawn by Beth of Creatively Beth.
- Lindsay with Artsy Fartsy Mama is sharing the recipe for DIY Snowman Bath Bombs that are not only ADORABLE but will warm you on a chilly Winter day.
- Up Craft an old CD to create this adorable and eco-friendly DIY Snowman Ornament. Jane with DIY by Jane takes upcycling to a whole new level.





Such an adorable idea.
These Snowman are so cute! I plan to use a few in my scrapbook pages this coming 2024 year! Thank you, Chelly!
This is the cutest little snowman gift tag!
I love how easy it is to make a tag with a snowperson. I don’t have circle punches, but I do have plain circle die cuts. Of course, they always could be cut using my Cricut. Thanks for sharing this cute tag. I love sometimes things which are simple.
This is adorable and would look wonderful on a winter card.
Thank you. The snowman tag is ao adorable! I’m definitely going to have to make some. And I love your other ideas. Thank you so much!
You are so creative.
Shelley Carlson
Gatheredblossoms@aol.com
These are adorable! And so easy to make!
These are so cute! Can’t wait to make them!
I think I can actually make this. Thank you for such great easy-to-follow instructions.
These are cute, and look easy to make!
I just moved and finally got an actual craft room. I only bèn setting it up and haven’t been able to craft. I can wait to get my hands dirty again.
Love how cute and easy those are
Love how easy and adorable these tags are!!!!
Oh my gosh! Those snowman tags are so cute!!!
Thanks Connie :o)
Happy Crafting!
Chelly
This are so adorable!