
How to Clean A Printer Drawer
Repurposing and Cleaning a Letterpress Drawer

Repurposing a letterpress drawer is a fantastic way to add a touch of vintage charm to your home decor. These vintage printer’s trays, also known as printer trays or type cases, offer endless possibilities for creative projects. In this post, I’ll share my journey of transforming a vintage letterpress drawer into a beautiful piece of furniture, along with practical tips on cleaning and repurposing these unique items.
Disclosure: Some links on this page are affiliate links – meaning if you click through and make a purchase I may receive a commission at no additional cost to you. For more information, read our full affiliate disclosure here.
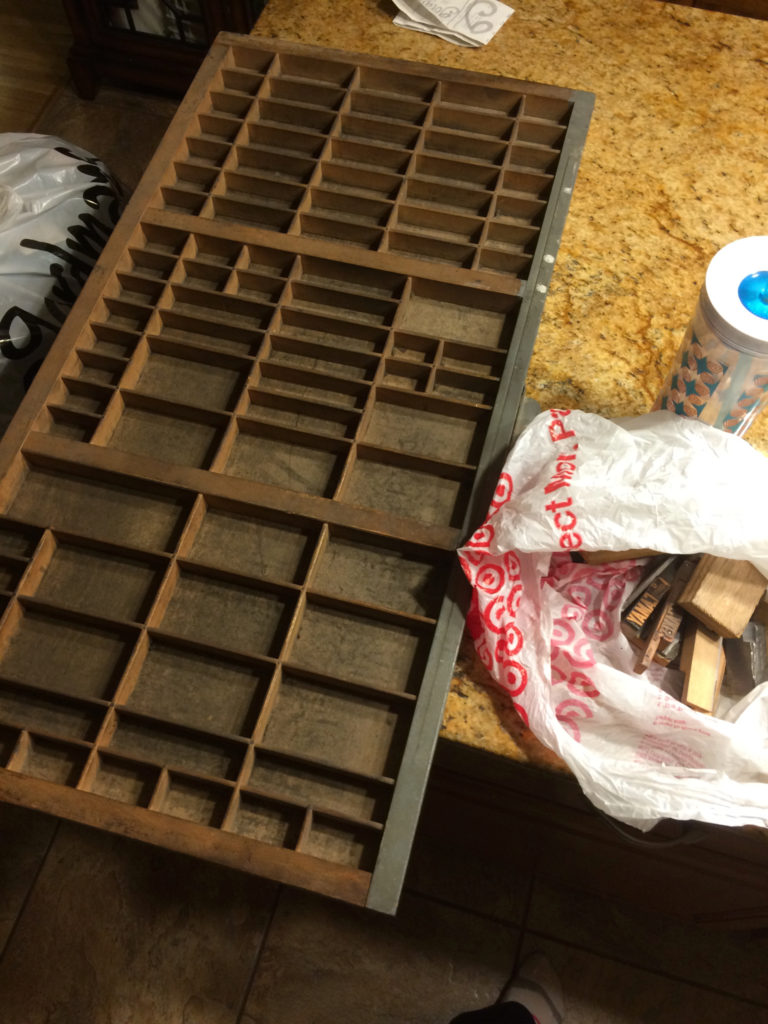
Here’s what it looked like the day I brought it home waiting to be cleaned and repurposed…
What is a Letterpress Drawer?
A letterpress drawer, also known as a printer’s tray or type case, is a vintage piece of furniture originally used in the printing industry. These drawers were designed to hold individual metal or wooden type pieces, organized in small compartments to make the typesetting process efficient (think printing way before the computers came around).
Each compartment housed different letters, numbers, images and symbols, allowing printers to quickly access and arrange the type for printing presses. See photo
Today, these letterpress drawers are cherished for their historical significance and unique repurposed decor, making them popular items for repurposing in home decor and craft projects. Their old design and tons small compartments offer endless possibilities for creative storage and display solutions.

Finding A Letterpress Drawer
Before repurposing, you’ll need to find a vintage printer’s drawer. These can often be found at a thrift store, garage sale, auction, or flea market. Keep an eye out for these hidden gems during your next treasure hunt!
Why Repurpose a Letterpress Drawer?
Letterpress drawers have small compartments that were originally used to hold printing dies and typefaces. Today, they offer a perfect place to organize and display a variety of items. Whether you’re looking to create a jewelry organizer, a craft room storage solution, or a unique piece of wall art, these drawers provide endless creative opportunities.
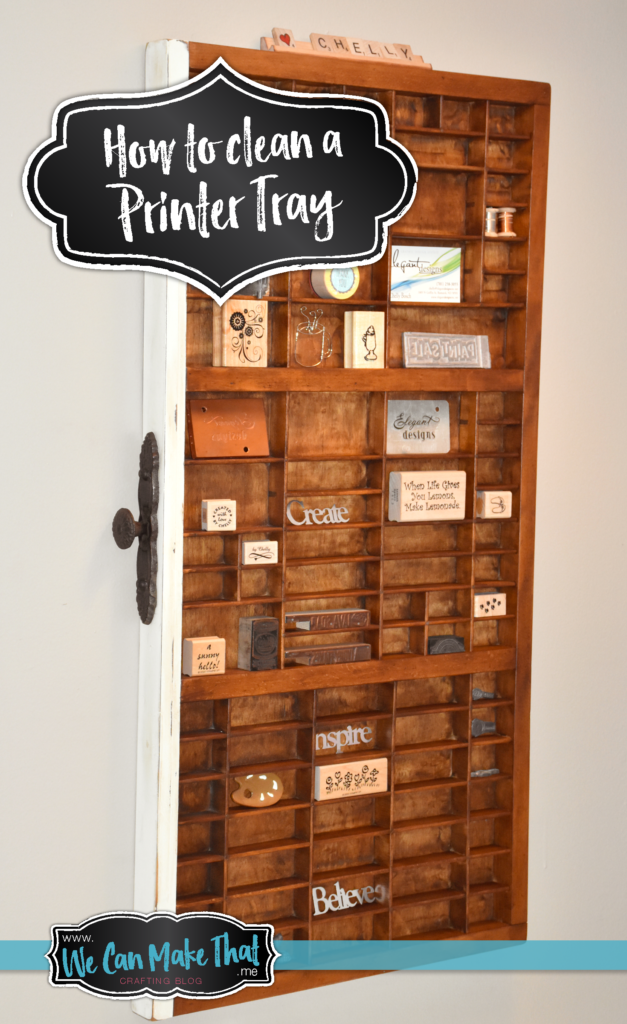
I was thrilled when I found a vintage letterpress drawer for $20 at a local garage sale. My first job was in a print shop over 20 years ago, so these drawers hold a special place in my heart. I couldn’t wait to display my first embossing die from my graphic design studio, which I started in 1997. However, cleaning and repurposing the drawer turned out to be quite the project. I’ll share some tips I learned along the way.
How to Clean a Printer’s Drawer
Cleaning a vintage letterpress drawer can be a challenging task, especially with all those small compartments and corners. You also want to make sure you remove the lead dust for all those years of use. Here’s how I did it:
I stared at it for weeks on my kitchen counter…. I searched Pinterest ideas… I tried to imagine where I would hang it on my office wall (the tall way or the long way) – also thinking about what colors to use on it…. or what varnishes to use…. I thought about what accessories to add to it….

Supplies Needed for Cleaning a Letterpress Tray:
So after much Pinterest research, I decided I would use a dark wood stain and white paint the bluefish drawer front with an off-white color. I also had a fun handle from Hobby Lobby lying around I decided to use.

- Vintage printer’s drawer
- Rags for cleaning
- Dremel Tool & Attachments
- 3 packs: Dremel Finishing Abrasive Buffs (511E)
- 3-4 packs: Dremel 1/2″ Brass Brushes (536-002)
- Varathane Gel Stain – Dark Walnut
- Varnish brush or rag
- Chalk paint (optional)
- Face mask (for lead particles)
- Shop vac
- Sanding blocks
- Glassboard (craft mat for easy cleanup on your craft station)
When I finally decided to start working on it, I Googled and searched Pinterest for hours, but I couldn’t figure out an easy way to clean it. Or anyway, for that matter, except “wipe it down” {duh!}, but I wanted to know how to remove the lead and scuffs in all those corners from years of use.
Mine came from an old newspaper business, so I’m sure it was used daily! I decided to buy a few dies from the same person to go in it (see pics below and this post for decorating ideas).


My Cleaning Process
Steps for Repurposing and Cleaning a Letterpress Drawer to use in my craft room / office.
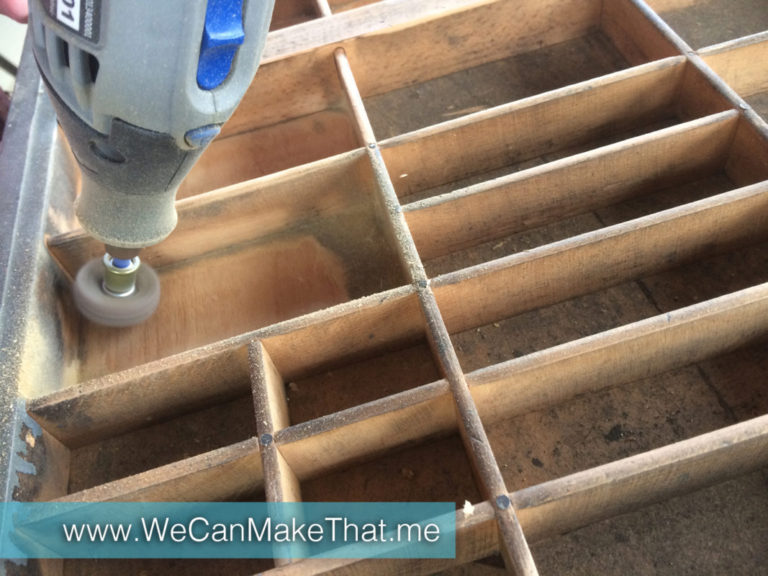
1. Preparation: Put on your face mask and set up your workspace outside for better ventilation. It was dusty from all those years in at a newspaper.
You can see the specs of paper flying around. I recommend holding a shop vac right next to it as it cleans to catch the flying debris. (But I needed a hand for the camera here!)
2. Initial Cleaning: Use a bristle-type scrub brush, an old toothbrush, and Murphy soap to remove surface dirt. This step helps but won’t fully clean the drawer, or use a Dremel Tool: Use the brush-like brass attachment on the Dremel tool to clean the main flat areas. The shop vac helps to keep the paper flecks and lead particles under control.
To start I used the brush-like brass attachment for the main flat areas. The paper liner is what the shop vac helps with. Without the shop vac, the flecks of paper just fell back into the drawer and you will keep hitting them with the sanding tool.

3. Corners and Small Spots: Use the buffer attachment on the Dremel for the smaller compartments. This process takes time and may require multiple buff attachments (I used about 4 of them I think).

4. Cosmetic Changes: Use this step to make cosmetic changes and remove some sections. I wanted to smooth out what was on the front side of the drawer. I sanded down the painted part after removing the handle. I plan to chalk-paint this part so it doesn’t have to be perfect. I just got some of the gashes sanded down from the wear and tear over the years. I used my electric hand sander, and it took about 5 minutes.
5. Final Cleaning: Use an air compressor to blow away the remaining dust, then wipe the drawer with a wet, soapy disposable rag. Now I’m ready to varnish. (I’m so excited!!)
Here’s a close-up picture of printing dies these printer drawers were used to store…

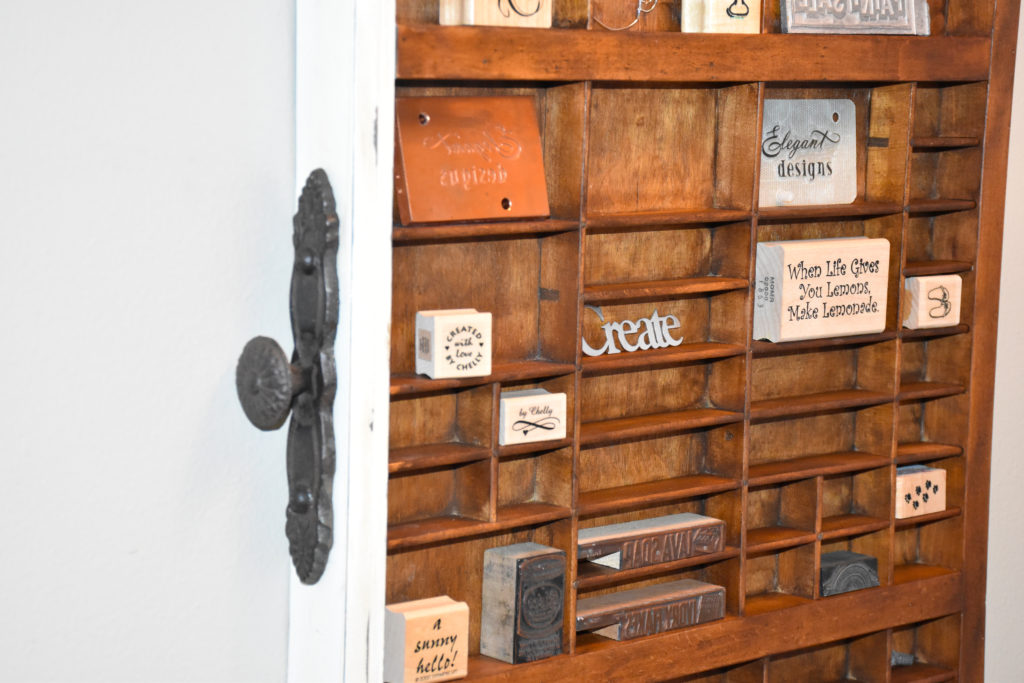
Creative Ways to Repurpose a Letterpress Drawer
Now that your drawer is clean, it’s time for the fun part—repurposing! Here are some creative ideas on ways you can use your old vintage letterpress drawer:
- Craft Room Organizer: Store small crafting supplies like beads, buttons, and threads.
- Jewelry Organizer: Display and organize your jewelry collection.
- Sewing Room Storage: Keep sewing notions like needles, spools, and patterns neatly arranged.
- Wall Art: Create a stunning piece of wall art by filling the compartments with small decorative items.
- Display Case: Showcase collectibles, figurines, or family heirlooms.
- Crystal Collection Case: Store and display your crystal collection.
- Vertical Succulent Garden: Transform the drawer into a unique planter for succulents or air plants.
Repurposing a letterpress drawer is a rewarding DIY project that adds character and functionality to your home. By following these cleaning steps and exploring creative ways to use the drawer, you can turn this old piece of what is sure to be garbage into a unique and practical solution.


Related Posts
- If you liked this post or want to see more, Check out my following post:
- How to paint and finish the Printer Drawer
- How to set up a Craft Room
- Home SVGs for Crafts


Have you ever repurposed an old letterpress drawer for a unique craft project? What tools and techniques did you use to clean and transform it into a decorative piece for your home?
I know this is longshot, but I thought I’d ask you anyway.
I’ve saved this post for when I would be able to find a printer drawer to turn into a keepsake display. After a while I managed to find two! But the problem is there’s a leatherette/some kind of faux leather lining at the bottom of the drawers, it’s under the compartments – which can’t be removed – and I can’t remove the back either, because it’s nailed to the frame with a lot of nails and staples. I wouldn’t really mind keeping the lining, but I think of of the drawers’ lining has mildew and I’m not sure I should be keeping it there.
Any idea how would I go about to remove it? Would a Dremel help shred it so I can remove it bit by bit, at least?
Oh man, I wonder if you used an Xacto knife to go around the edges of each square (UGH) but maybe that would make it easier to remove it. If it’s glued down, I would try the Dremel and then maybe some Goo-Gone to help remove it. You could always get something to cover them, but like you said, you want to see under them (and that would be a lot of work to cover them or paint them). They do have different heads for the Dremel tools, maybe there’s one out there that would be more helpful than what I used ?? … I hope that helps, sounds like a fun project!
Thank you! I initially thought about using an Xact knife but then I forgot about it. It was either that or the Dremel. I’ll have to see whether Goo-Gone is available where I live, looks like a thing I’d want in my life regardless, so extra thanks for the suggestion!
Helpful post! I’m restoring a complete Hamilton Mfg Co printers cabinet. Luckily the guy I got it from has several in a warehouse and tons of drawers so I only picked 4 drawers with the dividers. Rest don’t have them. Trying to do so and also get matching drawer pulls was a task. Cabinet is going to hold my metal detecting finds. Both loose and in Riker cases. I finished stripping, sanding, patching,staining and poly on cabinet body. Now i’m on to drawers. It’s messy. Really tempted to take apart divided drawers from the back. So I can sand out the inky liner easily. Used a combo of head gun, wood chisel and orbital sander to get paper liner out of other drawers.
What a great idea. My dad loves metal detecting. He even sold them for years! I bet your system is great for storing and organizing your finds! I would love to see the finished picture if you want to share some day.
Does anyone have suggestions on some type of sticky goo to keep all the small items in place and not fall off when someone slams a door!
I use a glue dot. I roll it between my fingers so it’s not as sticky and a little smaller than the usual dots. They come off pretty easy too.
Was the back of your printing tray wood? I believe mine is particle board and thinking I probably cannot sand/stain?
Mine had a paper coating. So, I to remove that, then I sanded the years of ink off under that. It was a chore! But worth the time…
I love Museum Wax. I use the crystalline clear. Do not be stingy with it. I got my jars on Amazon. I have three trays, one which displays my collection of doll house blue & white china and two that will eventually display my collection of mostly national park pins. (They need cleaning so this tip helps.)
I just bought one of these to turn into an earring display. I took the backing off and was able to wipe off the backing and each slat, also easier to screw in the eye hooks.
That’s a great idea! I bet it turns out so cute!!!
Did you put the back on the thing again? If so, how did you get it off and back on again? Thanks.
I didn’t take mine off. But that might make it go faster. I’ll reattach it with small wood nails and wood glue…. Removing it would depend on how your drawer was made. If it was nailed on, that would be a cleaner removal than if it was glued on.
I have at least 10 maybe 16 Genuine English Printers Type-cases in use up-to 25 yrs ago when I stopped printing letterpress.
I would be happy to sell them. Their condition is used, some with Brass Joiners If interested please contact Me.
Do you have any of these left? Where are you located and price please. Thanks!!
Hi. Where are you. I’m keen to get a few of these even if some division are missing.
Thanks Ann
Are they still available?? I would be interested in some pictures of what you available to sell. Thanks!
Sorry, this gem isn’t for sale. I’m flattered you ask though! thank you.
Hello I might be interested in a few of those drawers myself.. I also have 1 that I’ve been starting at thinking the easiest way to do it and corporate it into my jewelry holder/ or something …lol. But def need a couple more .. sweetkeyta@gmail.com.. ty God bless have a good day..
This is awesome! Thanks for your documentation and willingness to share!
It looks great! Just got one myself and was looking for guidance on how to clean it. Glad I found your post! 🙂 Also, any tips on the appropriate hardware to use for hanging it on a wall?
I believe I nailed 2 heavy-duty sawtooth hangers to the back.
Thank you for the how to! Be proud that you’ve saved many people from many hours of research. You rock!
That drawer turned out awesome! What a mess to work through but well worth the end result.
Thanks, Tanya! It reminds me of my last job working in a print shop…. Long, long ago. haha
Here is mine that I’ve had for 45 years or more. The oldest item in it is from WWI., a token used for rationing. Everything is special to me. Every few years I dust each item and compartment which takes about four hours.
The weirdest item is my daughters dried up umbilical cord remnant. Why I saved that, I don’t know! Also her baby teeth, my high school class ring, photo from my husbands college ID. Airline wings from first flight our daughter took. Old dance card leather book from mother.. souvenirs from travel like London carriage, windmill, seashells, bark from a tree in Hawaii. A small loaf of bread from Mexico that was this hard the day it was served. I’ve made a list of all the items in the tray.