
Easy DIY Floating Shelves
We were knee
Being over-taken by the remodel mess already, what’s another mess matter? Right? Time to paint the bathroom and make new shelves too. (Great idea, I know! LOL)
We had the standard shelf unit over the toilet that just wasn’t doing it for this DIYer. The 80s rock tile has grown on me. The before picture just doesn’t do this room justice.

Supplies for Floating Shelves
- Varnish & rags (I used Minwax – English Chestnut 233)
- Unfinished board 3 at 2″ x 8′ x 12″ (cut into 3 pieces)
- L brackets (our Menard’s had black ones)
- Sandpaper
- Sander (or sand by hand)
- Screws for shelf and L Brackets
- Screws for attaching to the wall
We had our hardware store cut the board in 3 even pieces for us.

How to make this Easy DIY Floating Shelves
I decided to get my daughter involved to make these easy shelves. She’s not my creative kiddo, usually her brother is more excited to work on these type of things. However, they are going into the bathroom she uses, so mom voted she help. HaHa. Plus, you don’t have to be a creative to make these easy shelves.

Since the hardware store cut the shelves already, we only have 3 little steps left. I was surprised how easy these were to make.
Step 1 – sanding time!
Sand the boards. I use 220 grit and sanded the imperfections off. Then I wanted to add some character by rounding off the counters and smoothing up the edges.
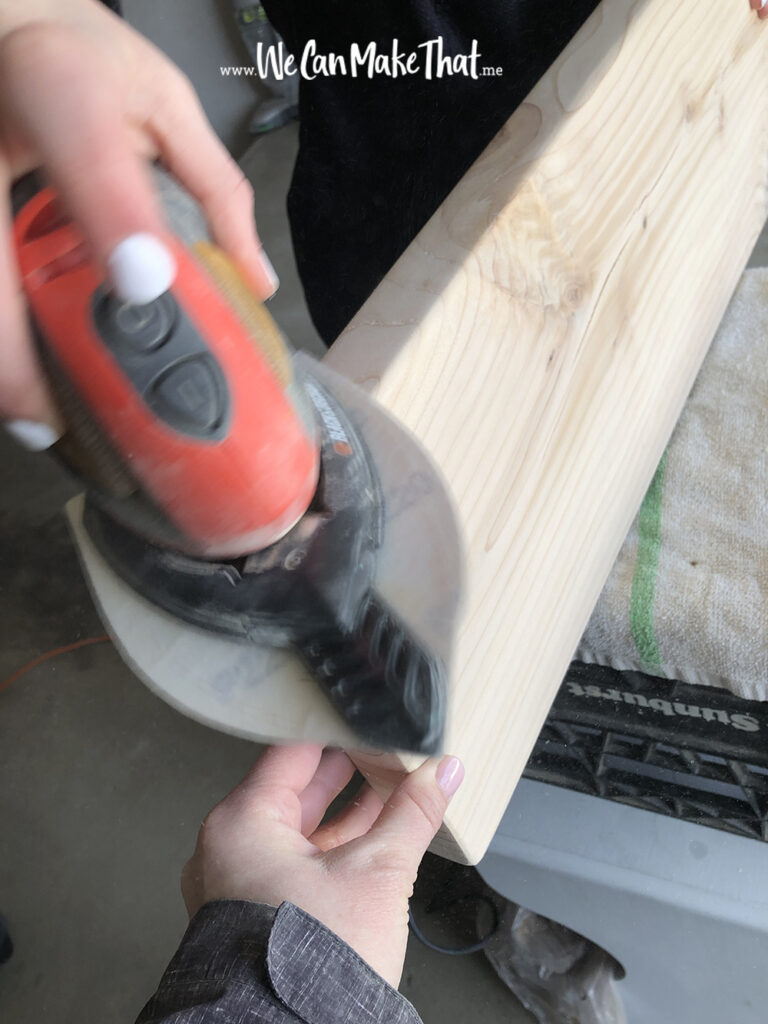
Once we had the shape we smoothed it out with 110 grit. It was a ruff piece of wood but that was the character I was going for these DIY floating shelves.

Step 2 – varnish or paint
Varnish. This color was great. Goes well with the little shelf from Hobby Lobby we had hanging up already.
We applied it with a sponge and wiped off the excesses. I did 2 coats. My goal was to match the shel
Step 3 – hanging the shelves
Brackets for hanging. This was easy since the L brackets were already black we simply screwed them to

What will we DIY next as we are on this remodel train…. ?
These were so easy! What have you made that turned out so easy but was adorable too. I have to admit that the fresh coat of white paint helped a ton as well.


Definitely sending this to my daughter. She was looking for ideas to make floating shelves for her new home!
These look wonderful. I just might need to try this at a house were buying. Thanks for sharing.
Thanks for the kind words. Good luck with your new house!
I need something like this in my kitchen. I have looked everywhere for 12 inch long shelves. No luck. I need to just make them like you did!
That was me too. I couldn’t find any the right size. And these were so much cheaper than anything else I found.
I love those floating shelves
I love these! We’re buying our first home and I think I need to make something like this to hang up ?
Thanks! They would be great in an office or kitchen too! Best of luck with your move!
Those are beautiful!
I was looking for a nice shelving unit for my bedroom. I love this more than any of the units you can buy!! Thanks so much!!
I bet they would look cute in a bedroom! Great idea.
Omg I love this we just sold our $400,000 house and moved into a condo the size of my master bedroom over there ?? I sooo need to make these for this bathroom. It sucks downsizing! Fantastic job girl u rock!!!!
Thanks Hope!
That sounds like quite the change!!! Whoa!!
They were so easy to make.
Thanks for reading!!
I love this idea! Going to tell my husband we need to do this
Oh, this is such a great idea!!! We are going to try that with our bathroom now! Thank you!
I love them going to try this weekend
Awesome! I would love to see how they turn out! I was surprised at how simple they were to make.
Thanks for the comment!
Chelly