How to Make a 3D Bow SVG (Easy Cricut Assembly Tutorial)
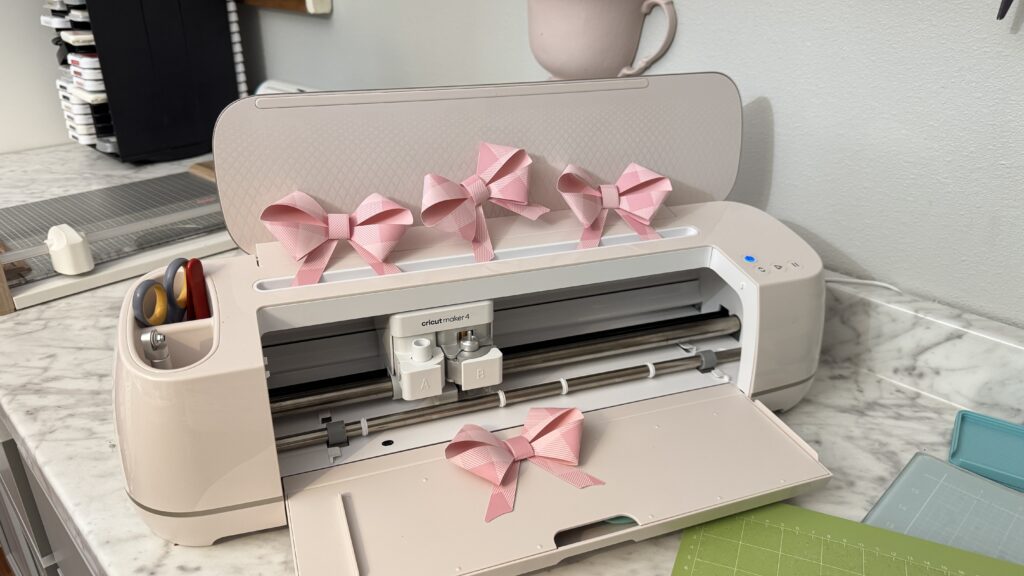
If you’re a Cricut crafter (or you use any cutting machine), you’re going to LOVE this 3D bow SVG. These bows are super cute, quick to cut, and honestly… they look way fancier than the effort required. My favorite kind of craft.
Disclosure: Some links on this page are affiliate links – meaning if you click through and make a purchase I may receive a commission at no additional cost to you. For more information, read our full affiliate disclosure here.
In this post, I’m showing you exactly how to cut and assemble my 3D bow SVG, plus I’ll share the best paper to use, the glue that actually holds, and a few fun ways to use them once you make a pile of bows and suddenly want to put them on everything.
Watch the 3D Bow SVG Assembly Video
If you’re a visual learner, you’ll love this. I walk through the full assembly step-by-step in the video below.

Why This 3D Bow SVG Works Best with Double-Sided Paper
This is the #1 thing that makes these bows look extra cute.
When you use double-sided paper, the inside of the loops shows as the bow folds, and that contrast gives it that real 3D look.
If you use a single-color cardstock, the bow still works, but it just doesn’t have the same wow factor.
For the best results, use:
- Double-sided cardstock
- Two-toned cardstock
- Pattern on one side and solid color on the other
Supplies Needed
Here’s what you’ll need to make this 3D bow SVG:
- My 3D Bow SVG file (linked below)
- Double-sided cardstock (recommended)
- Cricut or cutting machine
- StandardGrip mat
- Glue dots (my favorite for this project)
- Tape runner or double stick tape
- Optional: stapler (great for thick cardstock)
If you’re using super thick paper, glue dots or a stapler work better than liquid glue.
Valentine’s Day Cutting machine Files:
Best Cardstock Ideas for a 3D Bow SVG
You can make these bows with different paper types, but here’s what I noticed while testing:
Double-sided cardstock is the winner
It gives the bow dimension and that extra “finished” look.
Thick cardstock works great, but needs stronger adhesive
I used a really heavy cardstock that was probably over 100 lb, and it cut beautifully, but it needed glue dots to hold well.
Regular paper works, but the tape runner may not hold
If your paper is thin, the tape runner doesn’t always hold the loop tight, so glue dots still win.
How to Cut the 3D Bow SVG in Cricut Design Space
Step 1: Upload the SVG
Upload the 3D bow SVG into Cricut Design Space and add it to your canvas.
Step 2: Choose your paper direction
Here’s a quick tip that makes a difference.
Place the color you want on the outside of the bow facing up on the mat. That way, when the bow folds into shape, your outside color and pattern show exactly where you want them.
Step 3: Cut your bow
This file cuts fast because it’s a simple outline. Once it’s cut, gently remove it from the mat.
How to Assemble Your 3D Bow SVG
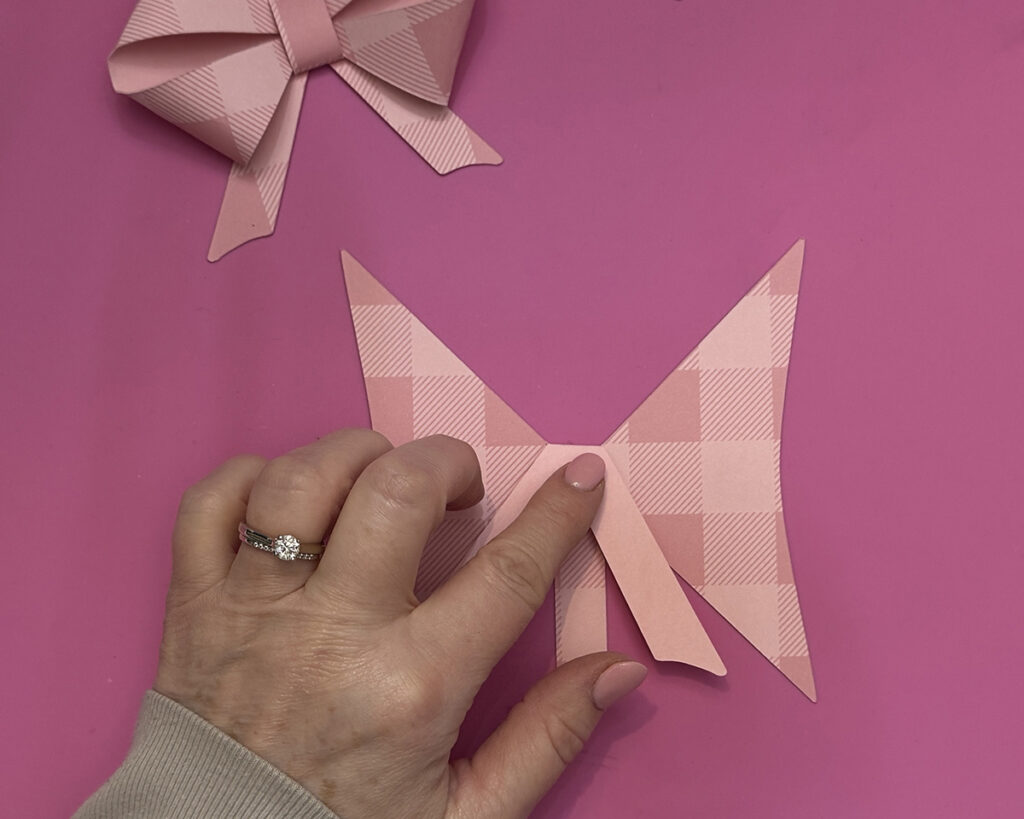
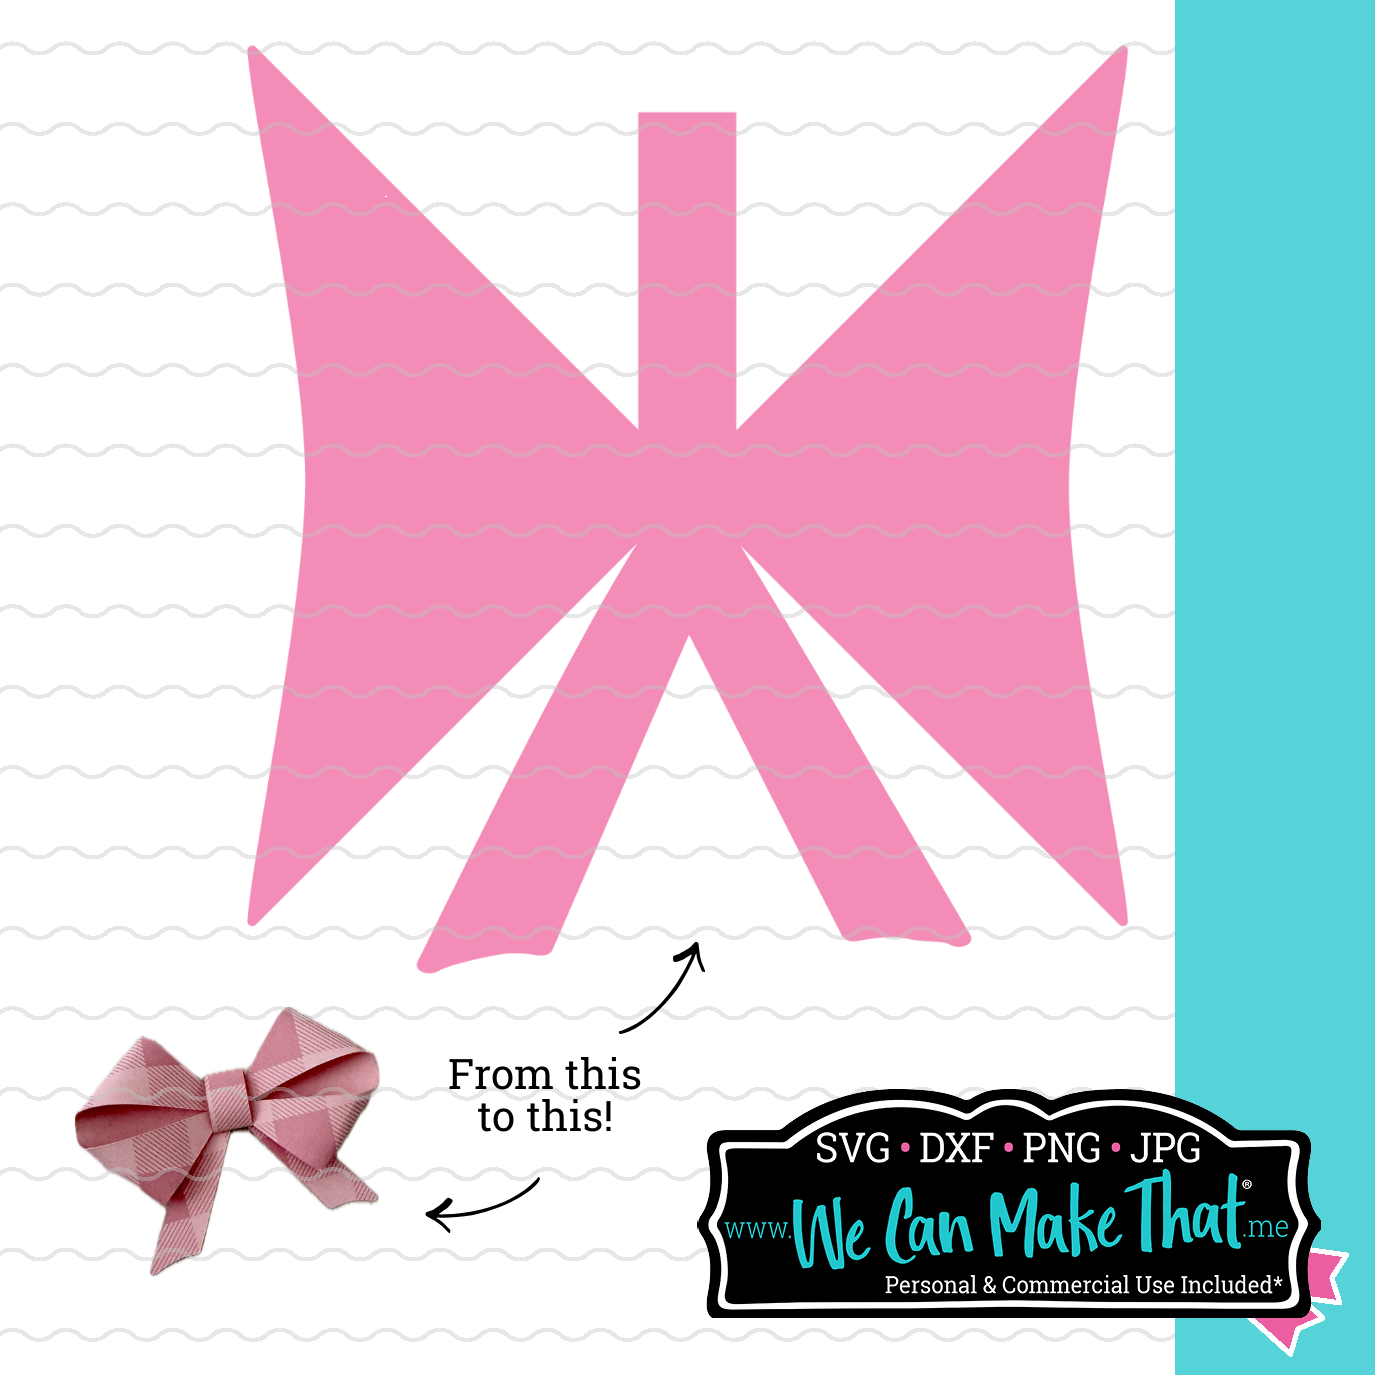
Now for the fun part, turning that flat cut into the cutest little bow on the planet. This bow is one single piece, and the folds create the loops and tails.
Step 1: Identify the top of the bow
Even though it looks like the tails are at the top, that actually is the top.
When you fold it down, the tails will hang on the bottom of the finished bow.
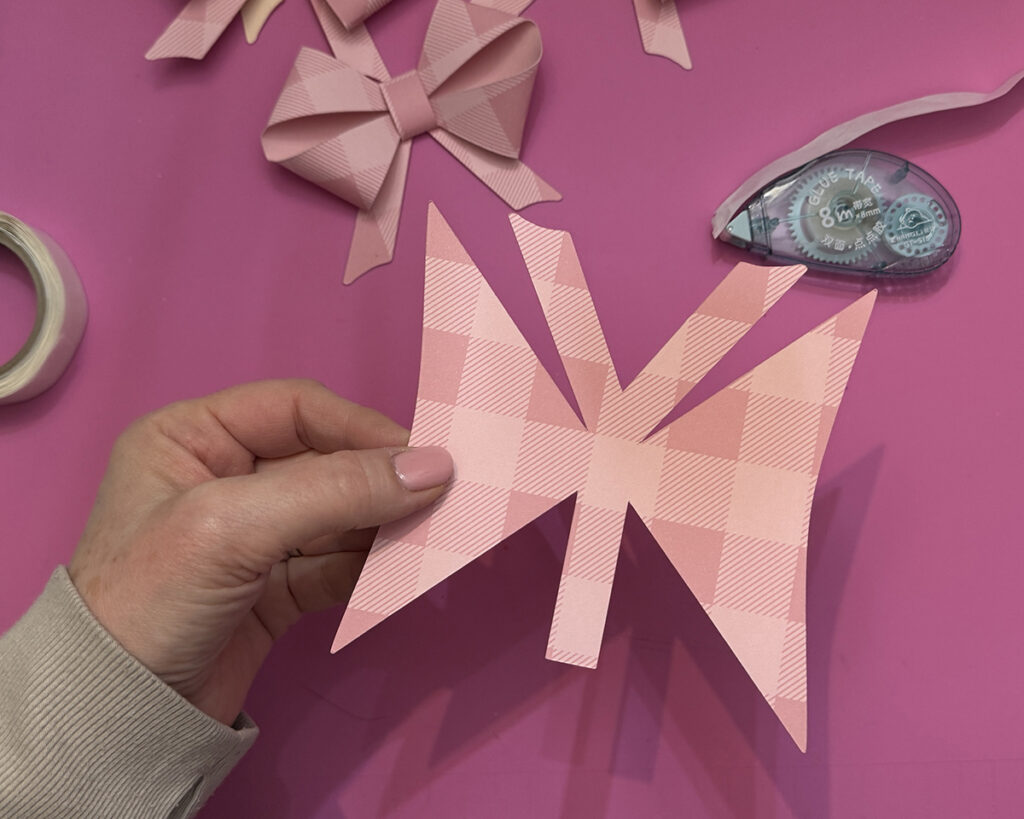
Step 2: Fold the tails down
Fold the tail section down so it sits behind the bow.
This creates the bow shape and positions the tails where they belong.
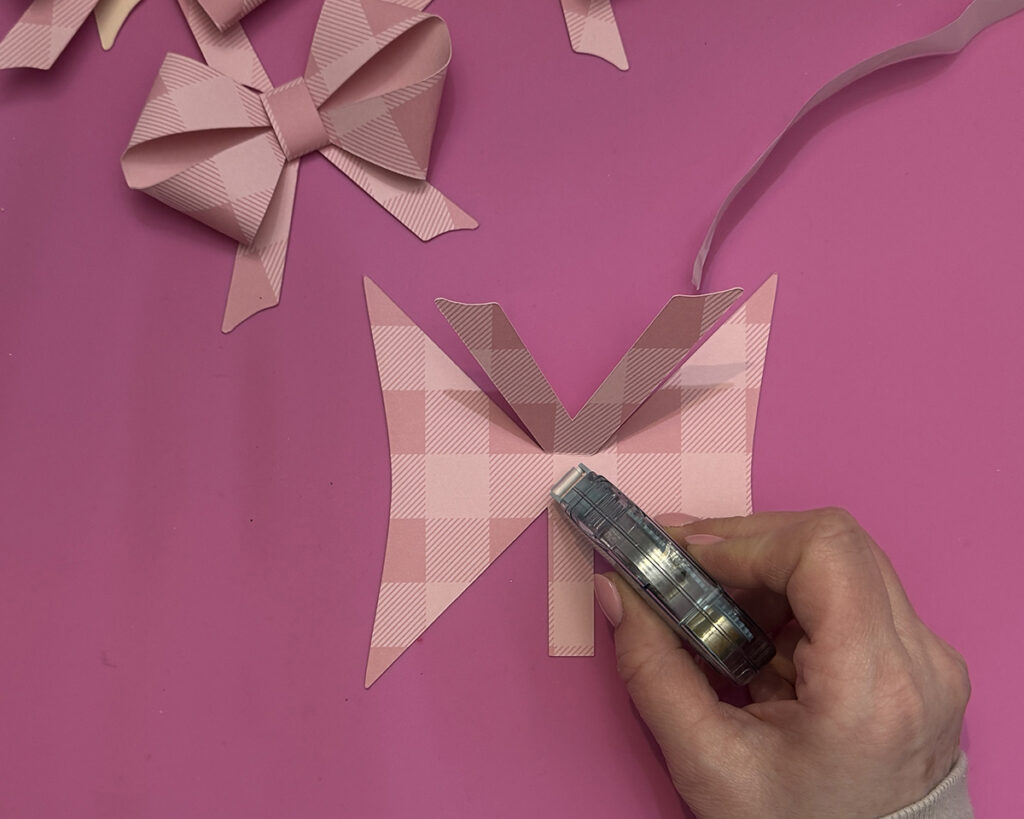
Step 3: Add glue dots to the center
Place a glue dot in the center area where the loops will attach.
If you’re using thick cardstock, glue dots hold the best. You can also add an extra glue dot if you need more grip.
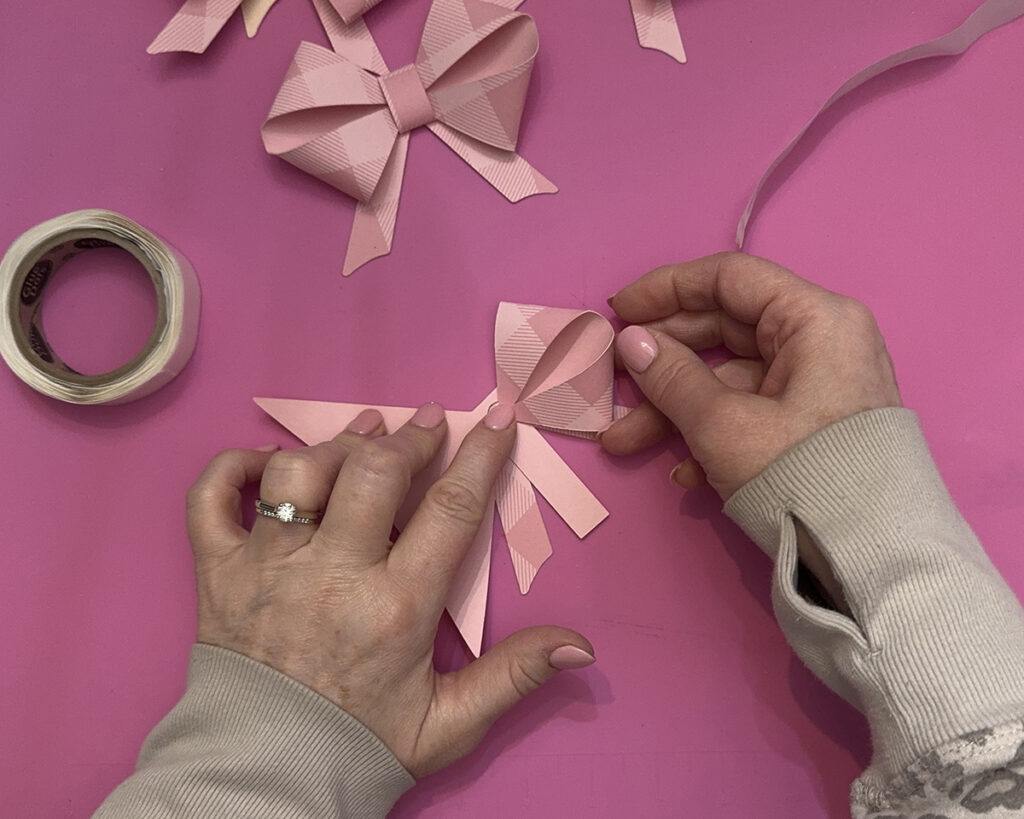
Step 4: Fold each side loop inward
Take one side and fold it toward the center.
Then fold the other side over the top of it. It does not need to be perfect, bows aren’t supposed to be perfectly symmetrical.
If it’s too perfect, it can start to look a little… stiff and fake known.

Step 5: Add a glue dot on top to hold everything
Once your loops are folded into place, add another glue dot on top to keep it secure while you finish the wrap.
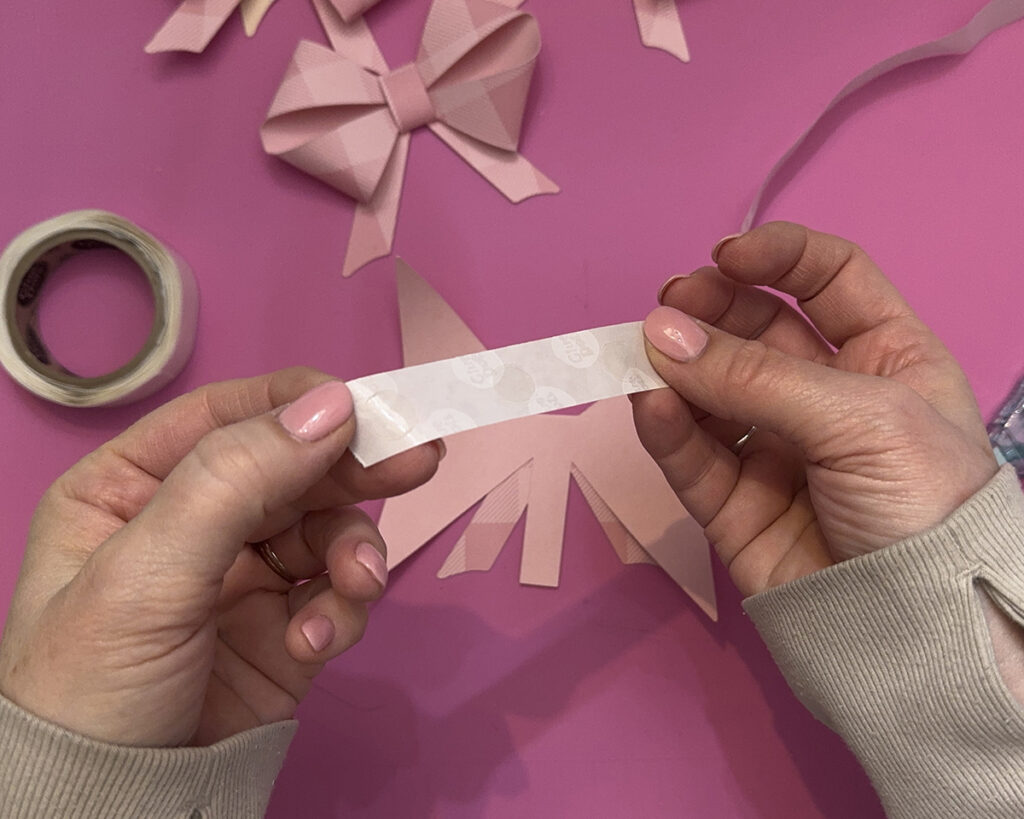
Step 6: Hold the tails down with double stick tape
Add a small piece of double stick tape or a tape runner behind the tails.
This helps keep everything tidy before the center wrap goes on.
Step 7: Wrap the center tab around the bow
Now grab the little wrap piece and curl it slightly if needed.
Wrap it around the center of the bow and adhere it to the back using a glue dot. This is the step that makes it look like a real bow.

Step 8: Adjust the bow shape
You can keep the bow loops loose and fluffy, or press it flatter.

If you’re putting it in a scrapbook, making it flatter is helpful.
If you’re using it for a banner or decor, leaving it a little loose gives it extra dimension.
My Best 3D Bow SVG Assembly Tips
These tips make a big difference, especially with thicker cardstock.
Use glue dots for thick paper
- I tried hot glue, and it didn’t hold the way I wanted.
- Glue dots held the best, and a stapler is also a great backup option.
Curl the loops slightly before you fold
- Thicker paper has “memory,” so adding a little curve helps it stay in shape.
- You can curl it gently using your fingers before attaching the loops.
Tape runner works better on lighter paper
- If your paper is thinner, a tape runner can work well for the center wrap piece.
- On thick cardstock, glue dots are still the best choice.


Fun Ways to Use Your 3D Bow SVG
Once you make one, you’ll want to make 12 more. It’s a crafting law.
Here are a few cute ways to use this 3D bow SVG:
- Add it to a birthday card front
- Use it on gift tags
- Attach it to wrapped presents instead of ribbon
- Decorate scrapbook layouts
- Add it to party decor or banners
- Make bow cupcake toppers for birthdays
Get the 3D Bow SVG Here
You can grab this 3D bow SVG directly from my website.
And if you want a whole library of files ready to cut anytime, my SVG Club is packed with designs that make crafting faster and more fun.
3D Bow SVG Free Tutorial
This is one of those projects that’s easy, fun, and makes you feel like you really did something fancy.
If you make these bows, I’d love to see them. They’re adorable in gingham, glitter, bold prints, and pretty much anything you have in your cardstock stash.
Now go make a few… and then pretend you didn’t immediately start planning matching bows for every holiday.
Connect with Chelly!